Wednesday, May 18, 2016

VLSM Exercise

Exercise 3: We want to divide 192.168.10.0 which is class C network, into four networks, each with unequal number of IP address requirement as shown below:
  •  Subnet A: 32 host.
  • Subnet B: 8 host.
  • Subnet C: 22 host.
  • Subnet D: 60 hosts.

Solution:
Organize, high - low
·         Subnet D: 60 hosts.
Host = 26 = 64 – 2 = 62                      N = 22 = 64
·         Subnet A: 32 host.
Host = 26 = 64 – 2 = 62                      N = 22 = 64
·         Subnet C: 22 host.
Host = 25 = 32 – 2 = 30                      N = 23 = 32
·         Subnet B: 8 host.
Host = 24 = 16 – 2 = 14                      N = 24 = 16


Subnet
Network Name
Network Address
Valid Host Range
Broadcast Address
Subnet Mask
22 = 64
D
192.168.10.0
192.168.10.1 - 192.168.10.62
192.168.10.63
255.255.255.192
22 = 64
A
192.168.10.64
192.168.10.65 - 192.168.10.126
192.168.10.127
255.255.255.192
23 = 32
C
192.168.10.128
192.168.10.129 - 192.168.10.158
192.168.10.159
255.255.255.224
24 = 16
B
192.168.10.160
192.168.10.161 - 192.168.10.174
192.168.10.175
255.255.255.240


Exercise 4: Given network of 201.4.3.0/24, subnet the network in order to create the subnetworks with the following:
  • Office 1 – 14 hosts.
  • Office 2 – 60 hosts.
  • Office 3 – 32 hosts.
  • Office 4 – 7 hosts.
  • Office 5 – 15 hosts.


Solution:
Organize, high - low
·         Office 2 – 60 hosts.
Host = 26 = 64 – 2 = 62                      N = 22 = 64
·         Office 3 – 32 hosts.
Host = 26 = 64 – 2 = 62                      N = 22 = 64
·         Office 5 – 15 hosts.
Host = 25 = 32 – 2 = 30                      N = 23 = 32
·         Office 1 – 14 hosts.
Host = 24 = 16 – 2 = 14                      N = 24 = 16
·         Office 4 – 7 hosts.
Host = 24 = 16 – 2 = 14                      N = 24 = 16


Subnet
Network Name
Network Address
Valid Host Range
Broadcast Address
Subnet Mask
22 = 64
2
192.168.10.0
192.168.10.1 - 192.168.10.62
192.168.10.63
255.255.255.192
22 = 64
3
192.168.10.64
192.168.10.65 - 192.168.10.126
192.168.10.127
255.255.255.192
23 = 32
5
192.168.10.128
192.168.10.129 - 192.168.10.158
192.168.10.159
255.255.255.224
24 = 16
1
192.168.10.160
192.168.10.161 - 192.168.10.174
192.168.10.175
255.255.255.240
24 = 16
4
192.168.10.176
192.168.10.176 - 192.168.10.190
192.168.10.191
255.255.255.240

WDP - Database

Database

Databasealso called electronic database, any collection of data, or information, that is specially organized for rapid search and retrieval by a computer.

A relational database (RDB) is a collective set of multiple data sets organized by tables, records and columns.


Relational Database


What is SQL?

  • SQL is a standard language for accessing and manipulating databases.
  • SQL stands for Structured Query Language
  • SQL lets you access and manipulate databases
  • SQL is an ANSI (American National Standards Institute) standard

SQL Capabilities

  • SQL can execute queries against a database
  • SQL can retrieve data from a database
  • SQL can insert records in a database
  • SQL can update records in a database
  • SQL can delete records from a database
  • SQL can create new databases
  • SQL can create new tables in a database
  • SQL can create stored procedures in a database
  • SQL can create views in a database
  • SQL can set permissions on tables, procedures, and views


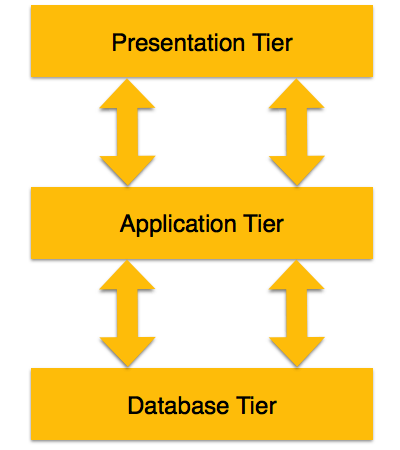
3-tier Architecture

A 3-tier architecture separates its tiers from each other based on the complexity of the users and how they use the data present in the database. It is the most widely used architecture to design a DBMS.


  1. Database (Data) Tier − At this tier, the database resides along with its query processing languages. We also have the relations that define the data and their constraints at this level.
  2. Application (Middle) Tier − At this tier reside the application server and the programs that access the database. For a user, this application tier presents an abstracted view of the database. End-users are unaware of any existence of the database beyond the application. At the other end, the database tier is not aware of any other user beyond the application tier. Hence, the application layer sits in the middle and acts as a mediator between the end-user and the database.
  3. User (Presentation) Tier − End-users operate on this tier and they know nothing about any existence of the database beyond this layer. At this layer, multiple views of the database can be provided by the application. All views are generated by applications that reside in the application tier.
Multiple-tier database architecture is highly modifiable, as almost all its components are independent and can be changed independently.
phpMyAdmin is a free software tool written in PHP, intended to handle the administration of MySQL over the Web. Frequently used operations (managing databases, tables, columns, relations, indexes, users, permissions, etc) can be performed via the user interface, while you still have the ability to directly execute any SQL statement.

Installing phpMyadmin
Important Notice: The application must be installed within the wwws directory.
Follow the steps below to install the phpMyAdmin program into your account on Webserve:
  1. Login to your Webserve account using an SSH command line client such as PuTTY. For further instructions on this step, see: How to use PuTTY.
  2. Move into your wwws directory by typing:
    webserve:account> cd wwws
    If your account does not have a 'wwws' directory, refer to the Secure WWW Server document for information on creating this necessary directory.
  3. Install phpMyAdmin by typing the following:
    webserve:account> install_phpmyadmin
    An .htaccess file similar to the one below is automatically created in the phpmyadmin directory.
    AuthGroupFile /dev/null
    AuthType CAS
    AuthName "IU Network ID"
    <Limit GET POST>
    require user account
    </Limit>                                                                      
    You should not delete this .htaccess file. Removing it will make your MySQL database vulnerable to exploit.
    This .htaccess file currently restricts access to the IU Network ID 'account' where 'account' is the name of your Webserve account. You can edit this .htaccess file to add additional users to the line (separate each name with a space):
    <Limit GET POST>                                                                           
    require user account username1 username2                                                        
    </Limit>
  4. You will need to edit the config.inc.php file before running phpMyAdmin. To move into the directory where this file is located, type: cd phpmyadmin
    As you edit the file, make sure lines do not wrap as a result of your edits. If you notice the line wraps as you enter information, correct the line so that it does not wrap.
    Below is the section of the config.inc.php file that you need to edit in order to establish a database connection. Replace port numberusername, and password as shown below with the port number for your account and the username/password that you've granted privileges to when setting up your database.
    $cfg['Servers'][$i]['host'] = 'mysql.iu.edu'; // MySQL hostname
    $cfg['Servers'][$i]['port'] = 'port number'; // MySQL port 
    $cfg['Servers'][$i]['extension'] = 'mysql';
    $cfg['Servers'][$i]['connect_type']= 'tcp';
    $cfg['Servers'][$i]['compress'] = false;
    $cfg['Servers'][$i]['auth_type'] = 'config';
    $cfg['Servers'][$i]['user'] = 'username'; // MySQL user
    $cfg['Servers'][$i]['password'] = 'password'; // MySQL password 
    By default, the config.inc.php file has three blocks: one for connecting to the MySQL production server (mysql.iu.edu), one for connecting to the test MySQL server (mysql-test.iu.edu) and a blank one. The test server and blank ones are commented out so if you wish to establish connections beyond the first block, you will need to remove the "//" as these serve to "comment out" that portion of the file. Below is an example of the block with the comment tags still present.
    //$cfg['Servers'][$i]['host']        = 'mysql-test.iu.edu';//MySQL hostname
    //$cfg['Servers'][$i]['port']        = ''; // MySQL port
    //$cfg['Servers'][$i]['extension']   = 'mysql';
    //$cfg['Servers'][$i]['connect_type']= 'tcp';
    //$cfg['Servers'][$i]['compress']    = FALSE;
    //$cfg['Servers'][$i]['auth_type']   = 'config';
    //$cfg['Servers'][$i]['user']        = ''; // MySQL user
    //$cfg['Servers'][$i]['password']    = ''; // MySQL password

How to connect to the database (PHP)

Open a Connection to MySQL

Before we can access data in the MySQL database, we need to be able to connect to the server:

Example (MySQLi Object-Oriented)

<?php
$servername = "localhost";
$username = "username";
$password = "password";

// Create connection
$conn = new mysqli($servername, $username, $password);

// Check connection
if ($conn->connect_error) {
    die("Connection failed: " . $conn->connect_error);

echo "Connected successfully";
?>


Example (MySQLi Procedural)

<?php
$servername = "localhost";
$username = "username";
$password = "password";

// Create connection
$conn = mysqli_connect($servername, $username, $password);

// Check connection
if (!$conn) {
    die("Connection failed: " . mysqli_connect_error());
}
echo "Connected successfully";
?>

Close the Connection

The connection will be closed automatically when the script ends.

Example (MySQLi Procedural)

mysqli_close($conn);
This is a very important function as it closes the connection to the database server. Your script will still run if you do not include this function. And too many open MySQL connections can cause problems for your account.

Referrences:
  • http://www.britannica.com/technology/database
  • https://www.techopedia.com/definition/1234/relational-database-rdb
  • http://www.w3schools.com/sql/sql_intro.asp
  • http://www.tutorialspoint.com/dbms/dbms_architecture.htm
  • https://www.phpmyadmin.net/
  • http://webmaster.iu.edu/tools-and-guides/mysql/phpmyadmin.phtml